Ditch 3rd Party Cloud Print systems - Print Locally with Android!
How to setup local printing in Android 12
a step by step guide

Google now allows local network printers to be configured via the "Default Print Service" which now is bundled within most Android systems. All you need to know is the network name or the accessible IPv4 address of the printer. This is a great feature because it obviates the need for any 3rd party cloud printer services and keeps your data local to your network. This method also has the added benefit of requiring no internet access to work. You only need a LAN (local area network) and for the printer and the phone to be on that network.
- Go to Settings on the Android device.
- Now search for "Printing"
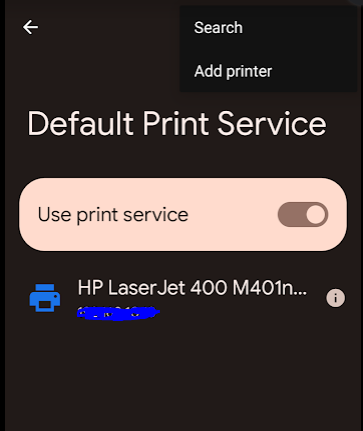
- Make sure Default Print Service is set to "On" and tap to setup.
- Tap the upper right menu then tap "Add Printer"
- Enter the IP address and tap Add
- Confirm this works by finding the printer displayed in the printer list
- Now try printing a document from an application. If the app supports printing it is usually found in an upper right side menu. Here it is in the Gmail Mail App.


It should be noted, this might not work on all printers. Many printers may still need an android driver to be installed or may not work at all with the Default Print Service. In my experience most business class network printers made in the last 10 years will work using this method but of course your mileage may vary.


Comments
Post a Comment